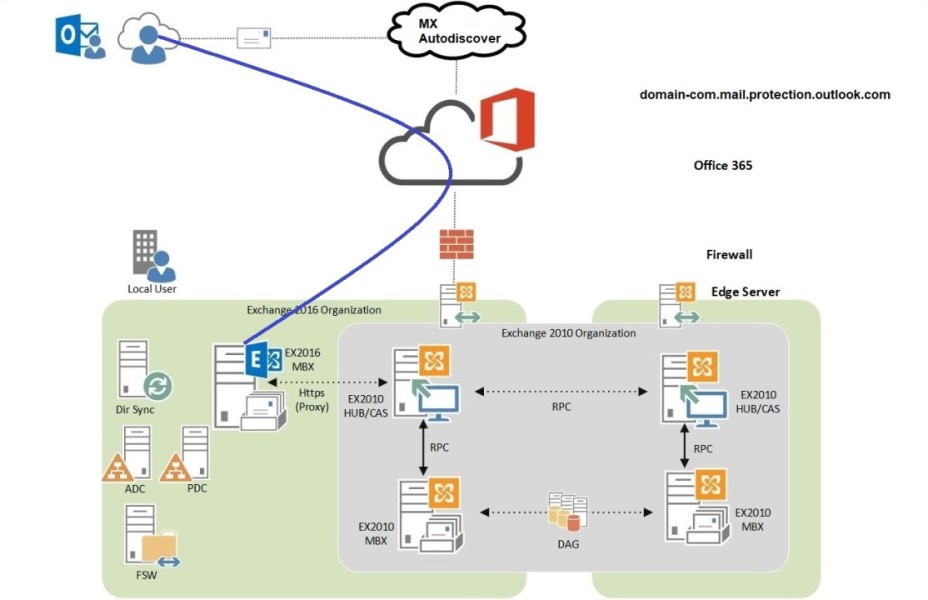
Before migrating completely to Exchange Server 2016, many organizations need to run it alongside Exchange Server 2010. This process is called coexistence. Coexistence ensures smooth communication between old and new servers during migration. So that the users can continue sending emails without interruption. In this guide, you’ll learn the prerequisites, installation steps, and post-installation configuration required for Exchange Server 2016 coexistence with Exchange Server 2010.
Prerequisites for Coexistence
In order to deploy Exchange Server 2016 in the existing organization first we have to make sure that Exchange Server 2010 is ready and prerequisites are satisfied.
Installation & Configuration of Prerequisites
Exchange Server 2010 required the following prerequisites in order to meet coexistence requirements;
- Service Pack 3 for Exchange Server 2010
- Minimum level of Roll Update is 11 (RU11)
Deploying Exchange Server 2016
Installation & Configuration of Prerequisites
Exchange 2016 Mailbox servers on Windows Server 2016
1. Run the following command in Windows PowerShell to install the required Windows components:
Install-WindowsFeature NET-Framework-45-Features, Server-Media-Foundation, RPC-over-HTTP-proxy, RSAT-Clustering, RSAT-Clustering-CmdInterface, RSAT-Clustering-Mgmt, RSAT-Clustering-PowerShell, WAS-Process-Model, Web-Asp-Net45, Web-Basic-Auth, Web-Client-Auth, Web-Digest-Auth, Web-Dir-Browsing, Web-Dyn-Compression, Web-Http-Errors, Web-Http-Logging, Web-Http-Redirect, Web-Http-Tracing, Web-ISAPI-Ext, Web-ISAPI-Filter, Web-Lgcy-Mgmt-Console, Web-Metabase, Web-Mgmt-Console, Web-Mgmt-Service, Web-Net-Ext45, Web-Request-Monitor, Web-Server, Web-Stat-Compression, Web-Static-Content, Web-Windows-Auth, Web-WMI, Windows-Identity-Foundation, RSAT-ADDInstall the following software in order:
- .NET Framework 4.8
- Visual C++ 2012 and 2013
- UCMA Runtime API 4.0
Prepare Active Directory and domains for Exchange Server 2016
Before installing Exchange Server 2016, you must prepare your Active Directory (AD) environment. This ensures Exchange can store and manage configuration and user information properly.
Step 1: Verify Permissions
You must log in using an account that has the following permissions:
- Schema Admins
- Enterprise Admins
- Domain Admins (for domain preparation)
These permissions are required to make schema and domain-level changes.
Step 2: Install the Latest .NET Framework and PowerShell
Make sure your server has:
- .NET Framework 4.8
- Windows PowerShell 5.1 or higher
This ensures Exchange setup commands run correctly.
Step 3: Mount the Exchange Server 2016 Setup Media
Insert the Exchange Server 2016 installation DVD or mount the ISO file.
Example path:
D:\Setup.exe
Step 4: Extend the Active Directory Schema
This step adds new Exchange 2016 attributes and classes to your AD schema.
Run the following command in Command Prompt (as Administrator):
Setup.exe /PrepareSchema /IAcceptExchangeServerLicenseTerms
Wait until the schema update completes successfully.
Step 5: Prepare Active Directory (Forest Preparation)
This step creates Exchange configuration containers and global objects in AD.
Run:
Setup.exe /PrepareAD /OrganizationName:"YourOrganizationName" /IAcceptExchangeServerLicenseTerms
What this does:
- Creates the Exchange organization structure in AD.
- Adds security groups and roles.
- Prepares the forest for coexistence with Exchange 2010.
Step 6: Prepare Each Domain
If your environment has multiple domains, run the following for each one:
Setup.exe /PrepareDomain /IAcceptExchangeServerLicenseTerms
Or to prepare all domains in the forest:
Setup.exe /PrepareAllDomains /IAcceptExchangeServerLicenseTerms
Step 7: Verify Schema and Domain Preparation
After preparation, verify the changes were successful:
- Open Active Directory Schema (MMC console).
- Check the rangeUpper value of the
ms-Exch-Schema-Version-Ptattribute.- For Exchange 2016, it should be 15317.
- You can also run:
Get-ADObject (Get-ADRootDSE).schemaNamingContext -Property * | where {$_.name -like "ms-Exch-Schema-Version-Pt"} | Select rangeUpper
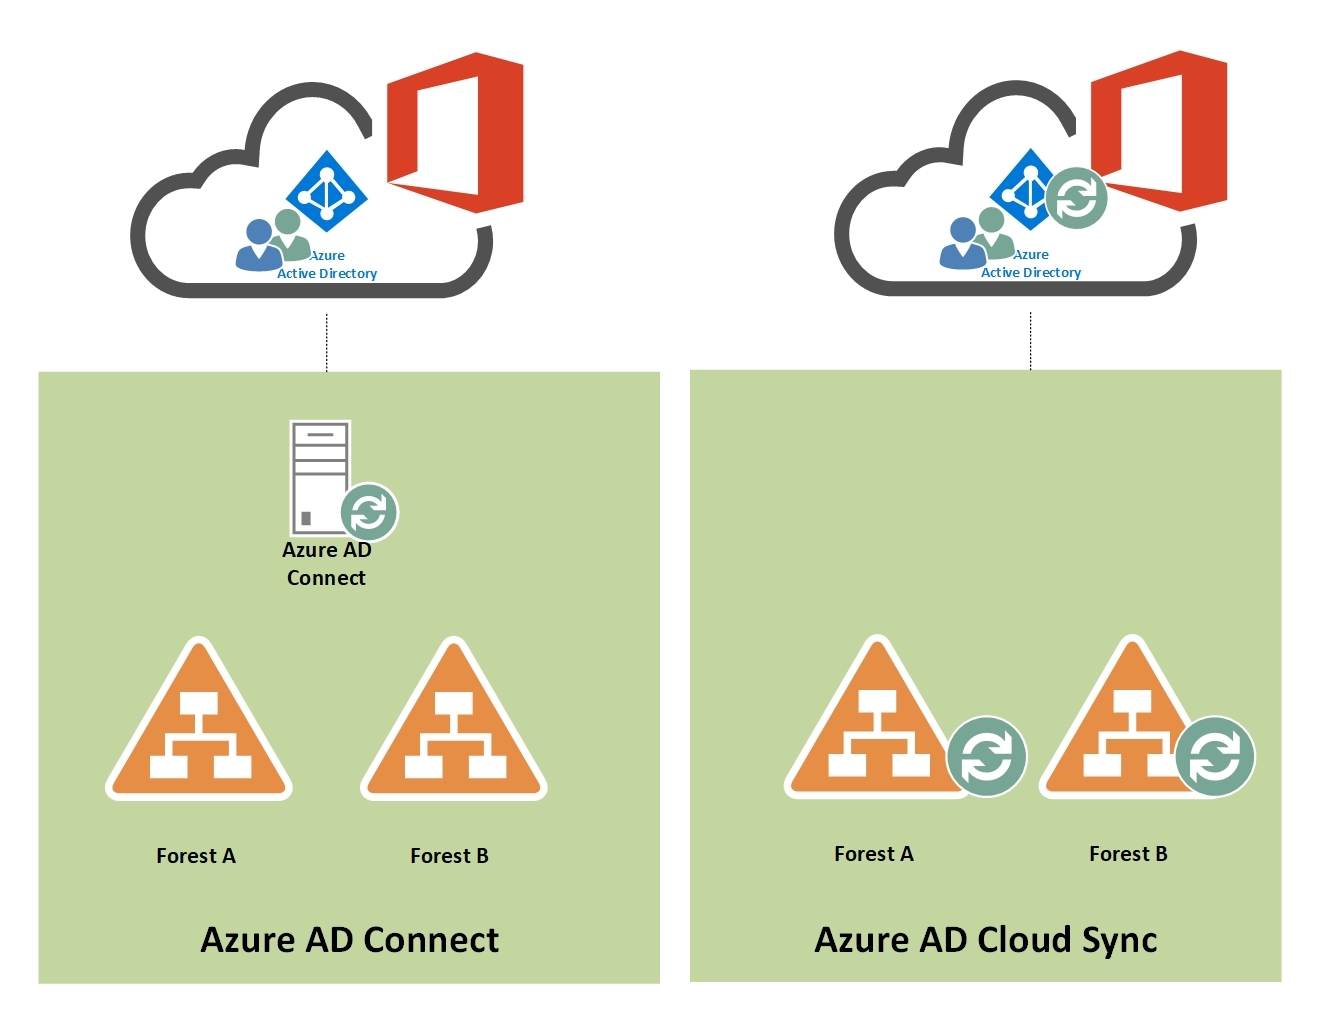
Step 8: Sync Changes with Azure AD Connect (If Hybrid Environment)
If your organization uses Azure AD Connect:
- Open Azure AD Connect.
- Run a manual sync to refresh the directory schema.
Refresh Directory Schema – AD Connect
Now we have to refresh Directory Schema by running Azure AD Connect
Finally we are good to go for installation of Exchange Server 2016
Installation & Configuration of Exchange Server 2016
Installation & Configuration of Exchange Server 2016
Follow the steps below to install and configure Exchange Server 2016 after completing the prerequisite setup and directory schema refresh.
Step 1: Prepare for Installation
- Ensure that all required prerequisites (.NET Framework 4.8, Visual C++ 2012/2013, and UCMA Runtime 4.0) are installed.
- Confirm that the server meets the system requirements for Exchange Server 2016.
- Verify that Active Directory and domain preparation have been completed successfully.
Step 2: Start the Exchange Server 2016 Setup
- Mount the Exchange Server 2016 installation ISO or extract the setup files.
- Open Command Prompt as an administrator.
Navigate to the setup directory and run the following command:
Setup.exe /IAcceptExchangeServerLicenseTerms /Mode:Install /Roles:Mailbox
- Allow the setup to verify system readiness and automatically install missing components if required.
Step 3: Complete the Installation
- Follow the setup wizard prompts to proceed with installation.
- Once installation is complete, restart the server to apply all configurations.
Step 4: Access the Exchange Admin Center (EAC)
Open a web browser and navigate to:
https://localhost/ecp
- Log in using administrative credentials.
- Begin the post-installation configuration process from the EAC dashboard.
Step 5: Configure Key Exchange Services
- Set internal and external URLs for services such as ECP, OWA, Autodiscover, EWS, and OAB.
- Install and assign an SSL certificate for secure communication.
- Configure DNS records for mail flow and service access.
- Set up Outlook Anywhere, IMAP4, and POP3 if required.
- Create and configure Mailbox Databases for user mailbox storage.
- Set up relay connectors for applications or devices that need to send emails.
Step 6: Hybrid Configuration (If Applicable)
- If your organization uses Office 365, re-run the Hybrid Configuration Wizard (HCW) from Exchange Server 2016.
- Update the existing Exchange 2010 hybrid topology to integrate with the new Exchange 2016 environment.
- Verify mail flow between on-premises and cloud mailboxes.
Step 7: Post-Migration Cleanup
- After confirming successful mailbox migration and stable mail flow:
- Decommission the Exchange Server 2010.
- Perform metadata cleanup from Active Directory.
- Decommission the Exchange Server 2010.
After Exchange Server 2016 is installed now perform the post installation tasks in the following order;
- Configuration of Internal/External Virtual Directories (ECP, OWA, OAB, Autodiscover, MAPI, EWS)
- Configuration of SSL Certificate
- Configuration of Internal/External DNS on Exchange Server 2016
- Configuration of Outlook Anywhere
- Configuration of IMAP4 and POP3
- Configuration of Mailbox Databases
- Configuration of Relay Connectors for Applications/Devices (if needed)
- Switch DNS and also update NAT entries in Firewall/Router
Updating Office 365 Hybrid Topology
Re-Configuring HCW (Hybrid Configuration Wizard)
The Office 365 Hybrid Configuration Wizard is re-installed and configured on Exchange Server 2016. This will update existing Exchange 2010 Organization topology after introducing Exchange Server 2016.
Finally !
Installing and configuring Exchange Server 2016 requires careful preparation of prerequisites, Active Directory, and schema updates to ensure a smooth deployment. By following the outlined steps, administrators can seamlessly integrate Exchange Server 2016 into an existing environment while maintaining hybrid coexistence with Office 365. Proper configuration of DNS, SSL, and mailbox databases ensures reliable mail flow and secure communication. Once the setup is complete and verified, the old Exchange Server can be safely decommissioned for a clean, optimized environment.